Table of Contents
Setup Cloudflare free in 2021 : Cloudflare is one of the biggest networks operating on the Internet. People use Cloudflare services for the purposes of increasing the security and performance of their web sites and services.
Cloudflare provides free DNS (Domain Name Server) management, Free SSL Certificate and DDoS mitigation to our blogs/website which helps to make more secure from attackers on our blogs/website. And Cloudflare keeps our websites secretly on whois data. Cloudflare gives us Free CDN (Content Delivery Network) also.
Note : If you want to configure only DNS for Free then you may read my another post.
How to manage domain and hosting DNS for FREE ?
What is CDN and what work does ?
CDN is content delivery network. Cloudflare had distributed group of servers geographically which work together to provide fast delivery of Internet content. CDN creates our Website’s temporary cache files on various data server all over the world which helps to deliver our website data faster to visitor from visitor’s nearest data server. That process helps to increase our website’s speed by decreasing page load time.
How to setup cloudflare free in 2021 ?
To set up cloudflare you have to follow this simple steps.
Step 01 : Go to www.cloudflare.com
Step 02 : Create an account. (If you have already an account then you may go with log in)
Step 03 : Click on add a site
Step 04 : Type your naked domain name. ( without https:// or www. )
Step 05 : You may go with the paid plan but now we can choose free plan.
Step 06 : Cloudflare will scan our exiting DNS records. (If you already build website or hosted on server cloudflare will import DNS)
Step 07 : If didn’t import automatically some important DNS records ( like: IP address & WWW ) then set DNS records Type A for IP address as your hosting ip address and Type CNAME for WWW.
Step 08 : Remove your exiting Name server and add new Name Server which provided by cloudflare in your domain provider’s client area’s Name server settings.
Your First Steps for Cloudflare setup is end here. Now you have to do 2nd further steps to set up cloudflare features.
What After Setup Cloudflare ?
After setting up Cloudflare, Now cloudflare will ask you to some Quick Start Guide.
1. You may on always use HTTPS.
2. You may use Auto Minify Freatures for minify your JavaScript, CSS & HTML Codes. This features helps increase your website’s speed and remind one thing, Some times your advance java animations and css styles may not work properly because of this Auto Minify features so you have to make sure you are going to use this features.
3. You may on Brotli . This will helps to increase your website speed.
4. In Summry : You may make sure all the settings you have set are ok.
Now you will redirect to Overview page or home page.
If your domain’s Name server is not saved cloudflare will tell you to change nameserver and if you already did. You have to wait sometimes Name server will take a little bit more time to save. After changed namerserver cloudfare will tell you Great news! Cloudflare is now protecting your site or active status message.

in this Overview page you can see your summery of analytics. And for more analytics you can visit Analytics tab.
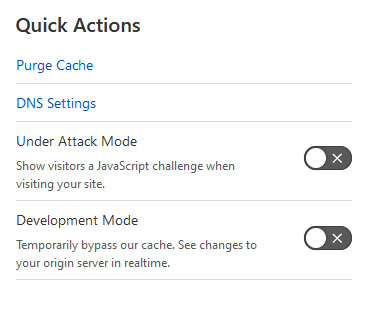
and in this tab you will get Quick Actions Section.

If You enable Under Attack Mode Cloudflare scans human or bot visitors on your website. Cloudflare Shows a JavaScript challenge for 5 sec. like this.

You may add more DNS settings & DNSSEC in DNS tab.
How to sign DNSSEC ?
Go to DNS tab in Cloudflare. Scroll to DNSSEC and clik on enable DNSSEC.
Now you will find some Keys. You have to copy and paste all keys in to your domain provider’s client area DNSSEC settings & click on Confirm. Now, wait for some time until set your DNSSEC.
How to Install FREE SSL ?
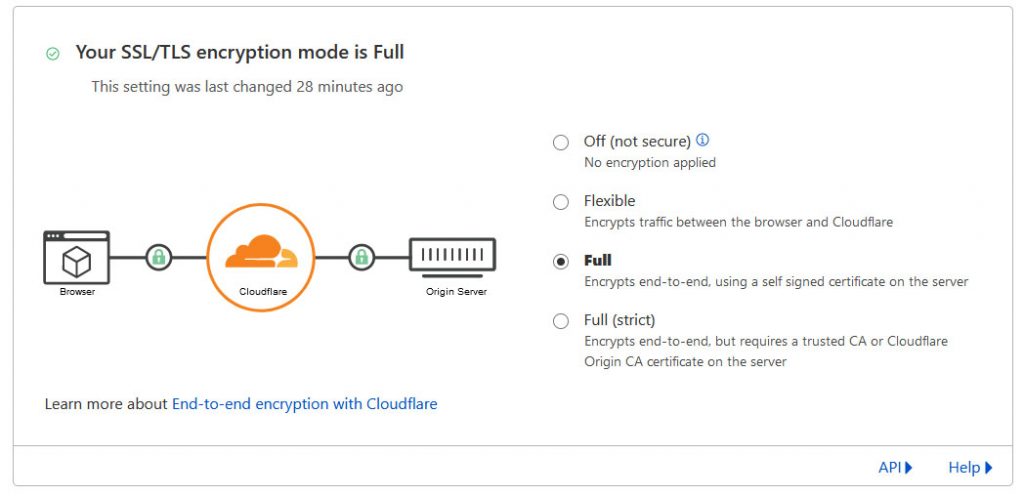
You can encrypt FREE SSL on your server. If your hosting provider provide FREE SSL then you may put on optional. If your hosting provider doesn’t provide FREE SSL then you don’t have to purchase additional SSL. You may encrypt Free SSL here.
Go to SSL Tab > Select on FULL radio button.

You may Check you website speed on Speed tab. You can configure cache on Caching tab.
Now you have set all the basic settings and you may look all the tabs and settings for more advance settings.
Thank You for Reading this my article. Please comeback here for more tips & tricks for blogging/Website building journey.
If you need any help please ask in comment section and want to give feedback leave a comment.


Great information shared.. really enjoyed reading this post thank you author for sharing this post .. appreciated
Fortunately, there is a new registrar cheap domain names from $0.99
Namecheap exists to help EVERYONE get, make, and achieve more online with less cost, hassle, and headaches. We offer everything you need to get online and thrive, from domains to hosting to security to specialist services and products — all with value built in.
Great prices, world-beating customer support, and extra resources come as standard. ==>> https://zeep.ly/rxViL
Itís hard to come by educated people for this subject, but you seem like you know what youíre talking about! Thanks