Table of Contents
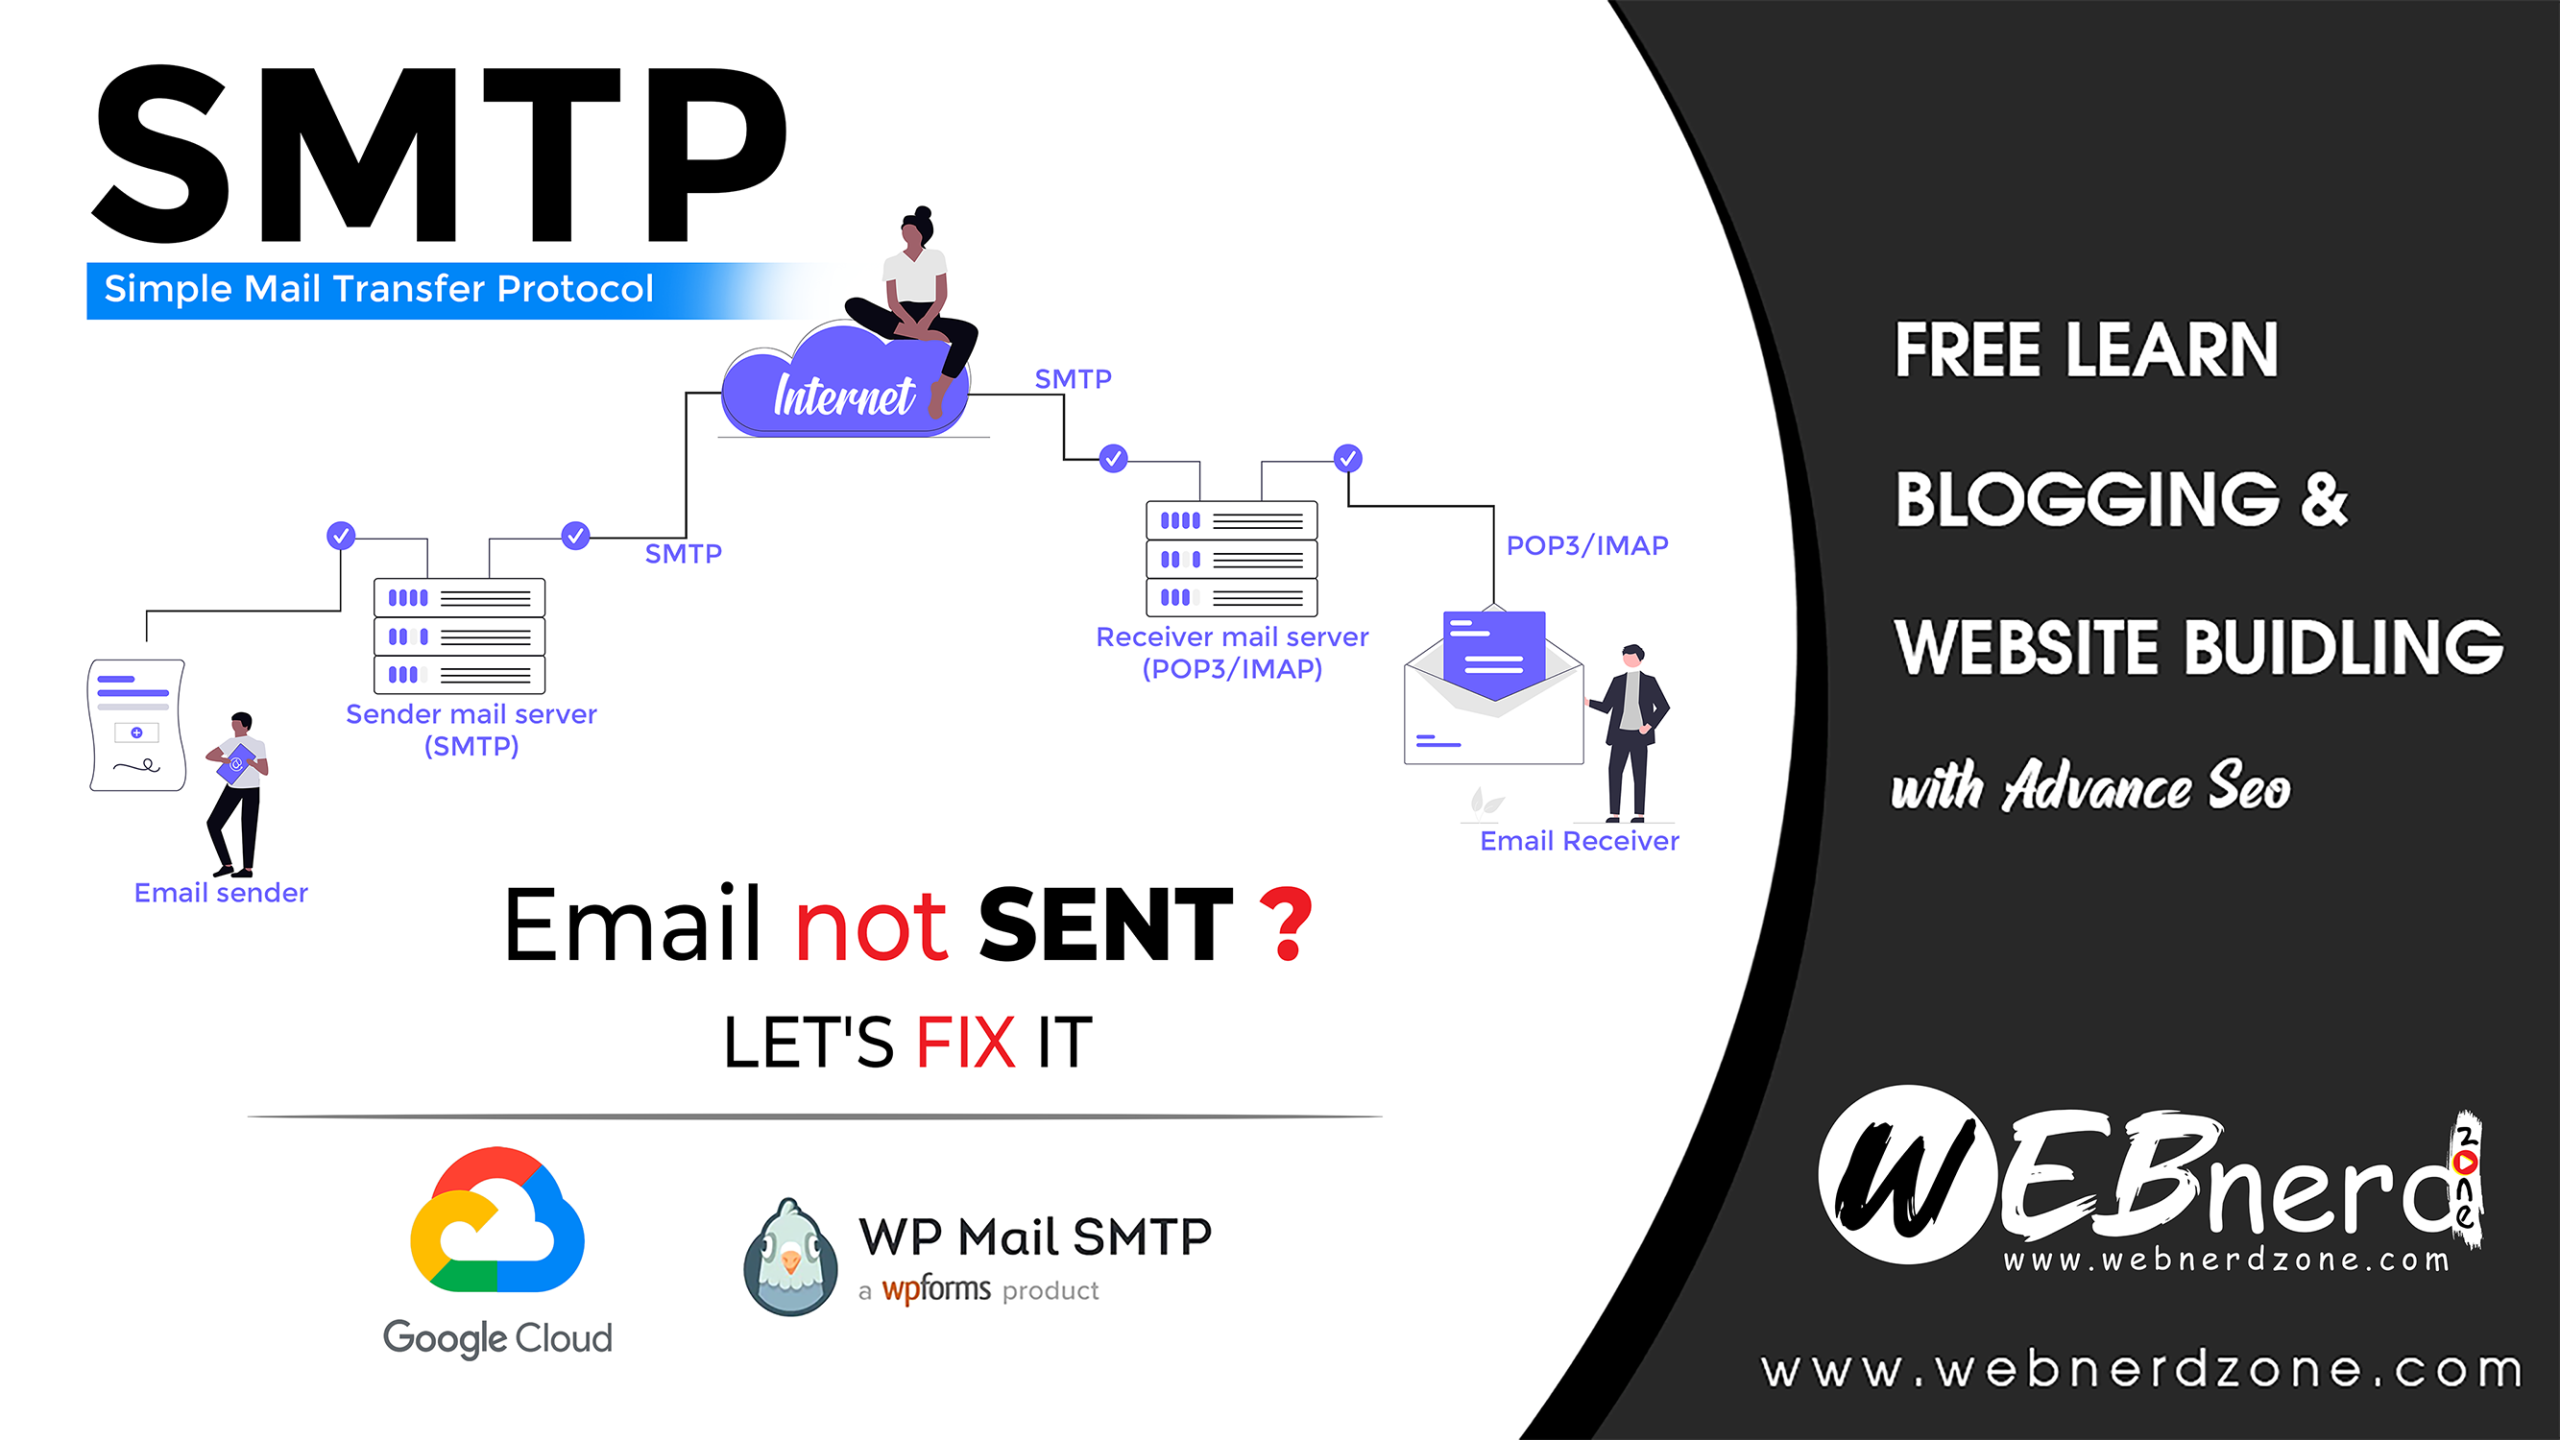
What is SMTP?
Simple Mail Transfer Protocol (SMTP) is standard protocol to send, transfer, deliver email through internet. We need to use SMTP to successfully deliver our emails to receiver. Its very easy to setup SMTP. We can get free plugins for WordPress users. Only creating business email is not enough step for complete email features. We can only receive email on our custom domain email. We can’t send email because delivery protocol wont configured itself we need to configure server protocol to send emails.
What SMTP actually does ?
- Sends emails from your website or email app
- Transfers emails between mail servers
- Handles outgoing emails (not receiving)
Example:
- You fill a contact form on a website
- SMTP sends that message from the website server
- The email reaches Gmail, Outlook, or another inbox
Why SMTP is important
Without SMTP:
- Emails may fail or go to spam
- WordPress forms may not send emails
- Password reset and order emails may not arrive
With SMTP:
- Better email delivery
- Fewer spam issues
- Reliable sending from your domain
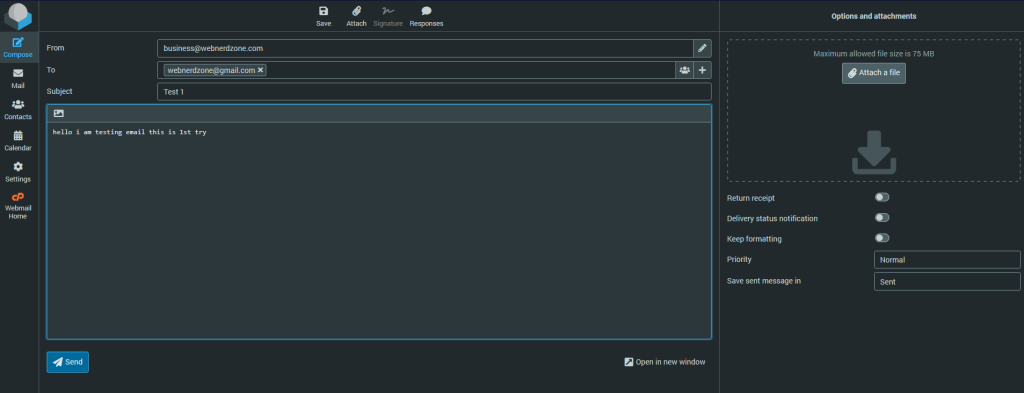
Here i am composing email via my business email. After all this fill up i have click on send button.
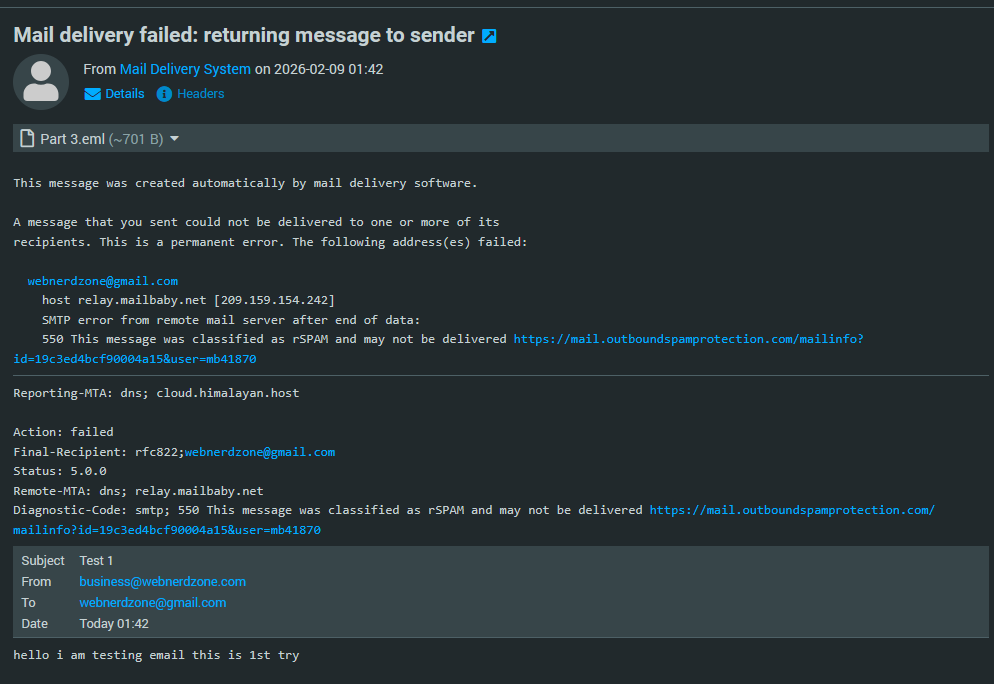
Within a minute i got reply email from mail delivery system. Saying “Mail delivery failed…” That’s why we need to setup SMTP.
How to setup SMTP ?
To setup SMTP here are major keypoints :
1. Create business email.
2. Install plugin.
3. Start Configuration
4. Create project on Google cloud
5. Connect Google API
6. Update DNS
How to create business email in cPanel ?
For this step i have already written a full details article in this website. You can checkout this post to get details guidance to email creating. Here is link to my previous post : How to create Free business email ? with own domain
There i have mentioned more option to create business email. You have to go through cPanel email. Not go with forwarding methodes because this methods will works only to get diverted emails not to send features available with this.
Install SMTP plugin on WordPress
Here is simple steps to install plugins. I hope you know how to search plugins and install it. you may also know about we have to activate plugins before use because i have mentioned this steps several times in my previous posts.
Now we are going to install plugin : WP Mail SMTP by WPForms – The Most Popular SMTP and Email Log Plugin
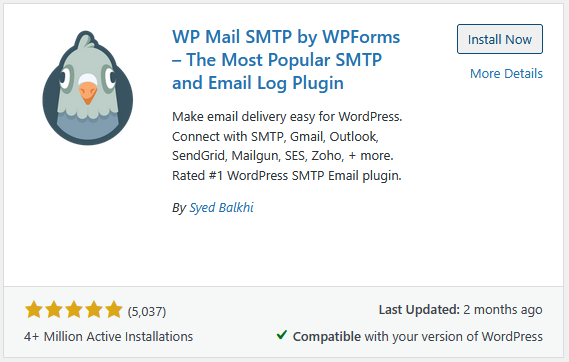
There are so many Free and paid plugins available but i am going to choose this one. This is the one of the good and top ranking plugins in this time. We can clearly see 4+ million active users and 5 on 5 star ratings.
Start WP Mail SMTP Setup Wizard.
After activating plugin we may redirect to setup wizard. If not you may go through Primary Connection > Setup Wizard > Launch Setup Wizard
Don’t worry we can set up this without wizard also. Just follow this simple steps :
- Go t WP Mail SMTP > Settings > General
input your gmail id in From Email box. - Make sure unchecked Force From Email. If checked, the From Email setting above will be used for all emails, ignoring values set by other plugins.
- Input From name also like gmail id.
- Make sure turn on Return Path. (Return Path indicates where non-delivery receipts – or bounce messages – are to be sent. If unchecked, bounce messages may be lost.)
- Select Google in Mailer section.
Now we have to setup API in Google Cloud.
How to Create API on Google Cloud ?
Here is important steps to enable APIs on Google Cloud. You search on google by typing Google Cloud Console or go with the URL : https://console.cloud.google.com
- Go to Google Cloud Console and log in with same gmail id which you have used before in plugin settings.
- Go to Select Project > New Projects
- inpute project name (for example : WEBnerd Zone – SMTP), leave as it is as no organization and then click on create.
- Wait few second in notification section you will see project created. and select project which you have recently created.
- Clink on Ham burger icon on left top corner and hover on APIs & Services > Library.
- Search Gmail API . Click enable
- now go to credentials. We have to create credentials to use it. Click on Create Credentials.
- Select and API > Gmail API. Check on User Data > Next.
- OAuth Consent Screen > input App Name (eg: WEBnerd Zone SMTP), select default email as user support email. Add app logo (Optional). inpute email on developer email. and click on save and continue
- Scopes is optional you may just click on save and continue
- OAuth Client ID > Application Type > Web Application. Name (You may leave as it is on Web client 1). and there you need to add Authorized redirect URIs > https://connect.wpmailsmtp.com/google/ (You can get this URL on WordPress WP mail SMTP setting section)
- Now click on create button. You can get your credential you may download it. or Copy client ID and paste into WordPress WP mail SMTP setting’s Client ID input box.
- Now we need Client Secret also. To get this go to Google cloud console > Select project > Hamburger icon > APIs & Service > Credentials. Select Credential ID which we have created just recent. below the action section at right side you may see pen icon click on this. There you will able to find Client Secret key now you can download or copy key and paste it into WordPress WP mail SMTP setting’s Client Secret input box.
- Now click on save settings in WordPress. Now you can see Allow plugin to send emails using your Google account button.
One last step on Google Cloud
- Before clicking on this button we need to do one more setting on Google Cloud Console.
- Google Cloud Console > Ham burger icon > APIs & Services > OAuth Consent Screen > Audience.
- App information > App name (like before, eg : WEBnerd Zone – SMTP), select default Email > Next.
- Audience > Make sure checked on External. and Next.
- input contact email and check on I agree to the Google API Services: User Data Policy. Now click on Continue or Finished.
- In Audience > Make publish App.
Now you can proceed through Allow plugin to send emails using your Google account button on WordPress. and sign in with gmail id.
You may face some warnings dialogues. Don’t worry you may click on Advance and Go to wpmailsmtp.com (unsafe). Now you have to give permission in Google id so click on continue buttons and Done.
Your SMTP is successfully configured. You can see Connected as (your gmail id) dialogue in Authorization section. You can now check by send email. I am sure your email will deliver.